
The liquid emulsion is also referred to as Liquid Light is the gelatin silver light-sensitive liquid photographic emulsion that is used in alternative photography printing processes based on applying it on any surface, exposing by an enlarger, and processing in conventional chemistry in the darkroom. Why liquid emulsion is often called Liquid Light? It is the name of the product manufactured by the Rockland company, which is now often used as a synonym for any liquid emulsion.
Paper for liquid emulsion
There are many kinds of ready-to-use darkroom photographic papers. But the most interesting and creative way is making the darkroom paper yourself using as the basis watercolor paper. It has an interesting fine texture that gives more depth to the prints and tactile sensation. But this also limits the use of this process. Some of the prints come out better than others of course.
The sources negative should be selected carefully. I can’t immediately say what will print great and what will not. This is the way of many tests and lots of errors. On the other hand, any error may become a part of the finished piece of art. Which paper to choose is the topic for a separate article but I prefer heavyweight cellulose papers at least 270gsm.

Watercolor paper texture
By the way, I cut the paper on the glass plate with a stationery knife. It does not leave scratches on the glass surface. Also, I use a ruler with a rubber spacer line. It is very convenient because prevents the paper from slipping during cutting.
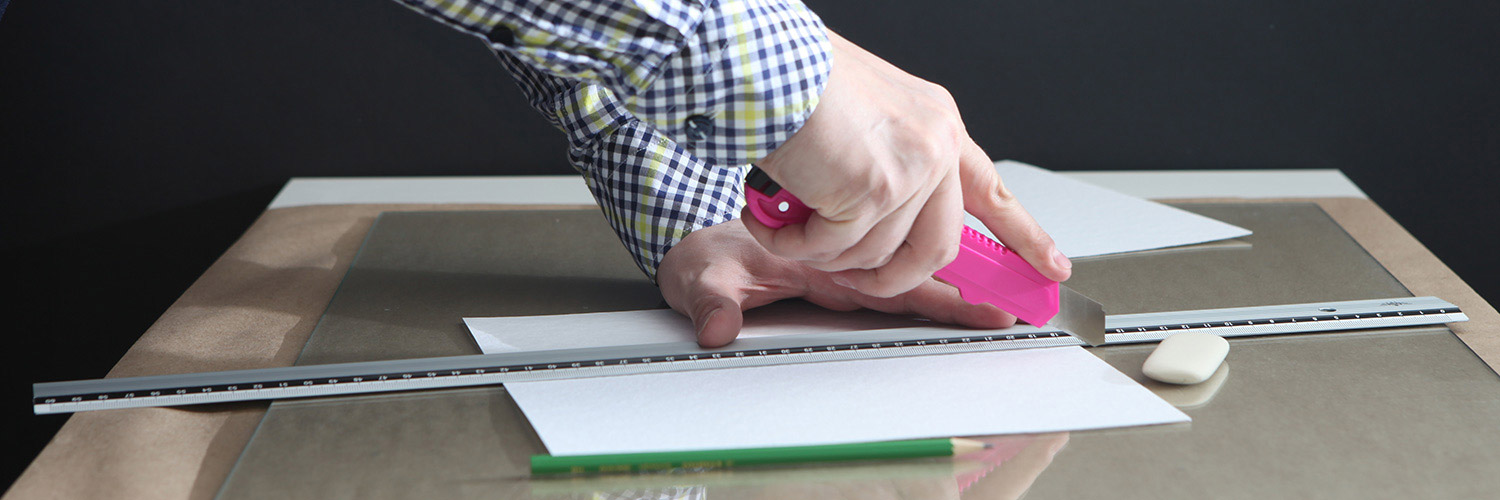
Cutting watercolor paper
Sensibilization with liquid emulsion
To make the paper suitable for printing it should be coated with the sensitive gelatin silver liquid emulsion in the darkroom under the red safelight as it was over 100 years ago. It is a complex and multistage process, which involves only manual work. The key highlight of this process is applying the liquid emulsion with a brush, sponge, or other tools. I personally prefer to use synthetic narrow brushes for emulsion coating.

Applying liquid light emulsion
This can be compared to preparing a canvas for further painting and to a large extent determines the character of a future print. As a result, every print comes out unique and slightly different from the next one. This is an extremely interesting technique, which allows me to achieve great expression and imagery. All mistakes and unsuccessful experiments are allowed to become a part of the “finished work”.
It should be noted that liquid emulsion actually is not liquid due to gelatin, and should be melted in a water bath before use. Also, some kinds of paper should be precoated with a suitable preparation layer before applying the emulsion. And it should be tested.
Drying
The paper coated with liquid emulsion should be dried in complete darkness.
Printing
The printing process is very complex and can hardly be described in brief. But it does not much differ from printing on conventional ready-to-use darkroom papers. Anyway, it requires great skills. To achieve the desired result you need to resort to various “tricks” until — as if by enchantment — you get what you want. A really perfect print should not only have the proper contrast and tonality but also depth and artistic expression.

Printing process
Fixing and washing
Printing with liquid emulsion process requires perfect fixing which means using a fresher fixer and sufficiently long washing. The last depends on the basis (wood, glass, canvas, etc.). So, additional tricks may help. As for papers — the more paperweights than the longer washing is required.
Finishing
After printing, rinsing, and drying photographs should be flattened. For this they are should be placed under a press for some time. To protect prints from external damage and make black tones deeper I prefer to cover them with varnish. I do it myself using a classical recipe combining sandarac, ethanol, and lavender oil. I do it myself using a classical recipe based on a mix of sandarac, ethanol, and lavender oil.

Finishing the print
Liquid emulsion printing examples
There is no way to make two exactly the same prints. Each individual print is slightly different from the next in its edition due to the physical nature of creating the prints. Have a look at my Venice and New York City printings to see some examples.


Hans
Hi Sasha,
Very inspiring work!
On Facebook I see you are using the Foma Liquid emulsion.
This comes with an hardener. Are you using this as well or are you using a hardener in the Fixer?
Or is the final coating enough to give the emulsion enough strength.
I’m thinking to purchase this Foma Emulsion also but would like to hear your experience.
Thank you very much in advance 🙂
Sasha Krasnov
Hello, Hans
Thank you for the comment!
Well, using a hardener depends on the surface you will use to coat with the liquid emulsion. Printing with liquid emulsion is a too complex process and quite difficult to say clearly — to use or not to use hardener. You always need to make some tests with a specific surface. I prefer watercolor papers as the main material. Such papers are already sized. I don’t use a hardener for such papers. But with some paper types, you may need to use a hardener. Anyway, you need to make some tests with and without a hardener. Personally, I recommend starting your own experiments with Hahnemühle cellulose papers. The most successful results I achieved with Torchon 275gsm, Veneto 325gsm and Cornwall 450gsm. These papers give very stable results without any precoating or even presoaking. Also, you should remember, if something goes wrong you have to change only one step to determine what caused an error in your process.
I’m glad to answer any further questions 🙂
Hans
Sorry for the late reply, Sasha, but thanks a lot.
This helps me for a first start.
Best regards
Hans
Renate Rienmueller
Great work Sasha, and thanks so much for the information. I have been playing around a lot with liquid emulsion lately, and really love the results. I noticed that you are using gum sandarac, lavender oil as your varnish. This is great, because i already use this solution for as a wet plate varnish. Could you please tell me what your recipe is for the varnish, how much lavender oil to your gum etc…i just want to make sure that i don’t ruin my images by using the varnish i already have.
(MY VARNISH IS: 400 grain alcohol, 60 gram gum sandarac and 40ml lavender oil) Any advice on this would be greatly appreiciated. kind regards, Renate.
Sasha Krasnov
Thank you, Renate! I do use the following recipe: 31g of sandarac, 200ml of alcohol, and 16ml of lavender oil. So, it is similar to your recipe but with less part of lavender. I guess the recipe is somewhat to play with. Of course, a series of tests should be made. I use old test prints in this case. Anyway, there are some moments I consider to be important: (a) The varnish is much better “works” on prints with a lot of dark scenes. So, it makes black tones richer and deeper; (b) I coat the varnish exactly over the emulsion was coated, but never over the paper border around it; (b) I use a synthetic mongoose brush, it’s soft and reliable. I hope it should help!
Renate
sorry for the late reply! Thanks so much for your advice! I will try this today! do you make it up and use it straight away? I will try this recipe and let you know how i go!
Thanks again Sasha
Sasha Krasnov
No problem. Nice to see you come back 😉
Usually, I mix a 200ml solution or less. I gather prints for some time as much as possible to varnish coat them with the varnish to leave the varnish as low as possible. Of course, I have gaps between this procedure for 1-2 months. When the age of solution turns half of a year I repeat a filtration procedure.
Lisa
How are you getting more contrast? A lot of my prints are too grey. I plan to try adding a small amount of developer to the emulsion before coating paper. I have also tried filters. I’m printing large (20 x30) so paper exposures are long.
Thanks,
Lisa
Sasha Krasnov
Hello, Lisa
In my experience, I can say that it seriously depends on the paper. All cotton papers produce low contrast and the prints look too grey. Some of the cellulose papers give great results, some “not bad” while others “too grey” also.
1) You need to make some tests using the same negative and emulsion mix but with various papers. Personally, I recommend Hahnemuhle Torchon and Veneto papers as a starting point in your experiments. Two months ago I’ve discovered another good paper for liquid light emulsion — Lana Grain Fin 300 g.
2) Developer. I use Kodak D-9 lith developer diluted 1+7. So, the less developer has diluted the more contrast it produces. Also, less diluted Kodak D-9 developer makes prints less colour-tinted. The reason is the developing time becomes longer for a more diluted developer. It should be noted that the default Kodak D-9 dilution for lith printing is 1+9.
3) If you do not like colour tinting of the lith developer you may try high-contrast developers like Ilford Ilford ID-14 or Kodak D-11. Kodak D-8 also makes prints colour-tinted but much less than D-9.
4) The contrast of liquid emulsion prints depends on the liquid emulsion type. What kind of emulsion do you use? Variable contrast like Rollei Black magic or fixed grade like Fomaspeed? In the first case, you may use contrast control filters.
5) I tried a blue filter with Fomaspeed fixed contrast emulsion and it was no big difference in contrast of the prints. Also, I tried adding a small amount of a standard paper developer like Dektol into the emulsion mix but did not notice a significant difference in the contrast. Maybe worth a try them both — blue filter + adding a small portion of developer.
6) Exposure. The less exposure time is the more contrast you get. So, my usual expose time is about 2-8 sec then I develop the exposed paper in a lith developer until black parts become of desired density.
Cheers! Hope it helps you!
Lisa
Thanks so much. My prints are large and using the typical water color paper has not been beneficial to the image I want. I suppose there would be a way to get the paper you mention in the U.S. and will try the different paper first. Another thing that has helped was using Aquafine to develop the film which pushes the film 2 stops giving more contrast. I usually use Rockland AG Plus emulsion but have tried Rollei Black Magic with no success. Smaller prints have more contrast. Things changed when I went much larger.
Thanks for your help!!
Sasha Krasnov
I do prints up to 33×33 cm with Fomaspeed fixed contrast grade 3 emulsion. The prints become more grey with this enlargement too. But it happens because exposure time is doubled compared to 16×16 cm prints. The more exposure time — the less contrast you will get. I’ve tested various developers including x-ray Kodak D-19 but only lith developers gave me appropriate contrast controlling. I have to keep exposure time for about 2-4 sec for small prints and 4-8 sec for large prints using 150 Watt lamp. Of course, all depends on film negative density. The rule “exposing for whites, developing for blacks” works great with lith developers and liquid emulsion.
But, I strongly recommend getting the good cellulose watercolor paper at first. Hahnemuhle Torchon is a really good starting point. Any new test I do only with this paper. It is inexpensive, lightfast and easy to get (in Europe). And there is a key thing — it gives very stable results! Any new developer dilution, emulsion hardening, adding developer into the emulsion and other tests I perform with this paper. Because printing with liquid light strongly depends on the paper type you need one which you will trust 100%.
Lisa
Thank you! Yes, the smaller prints, I have no problem with contrast. I ordered the paper you suggested and we will see. I may consider putting several prints together to make one large one!
I will let you know if I have great success!
Thanks
Sasha Krasnov
That is great! Anyway, it is really interesting to compare!
Paula
Hello. I appreciated your work, as well as the comments, as they were a great help.
I bought a bottle of Foma Liquid emulsion, but I had a question. To do some small works on watercolor paper, how do I do it? Can I prepare the whole emulsion with the hardener that came together or not? Many years ago I used one that was already prepared and used as needed. With this, I did not understand very well if after fully prepared it gives to save what was left or not.
Thank you.
Best regards,
Paula
Sasha Krasnov
Hello Paula!
My current procedure for melting emulsion:
1) Under the safe light open emulsion and cut of some part into separate light tight black bottle.
2) Put it in a the warm bath with temperature about 50C or less to melt it to the liquid state.
3) Finally, put some melted liquid emulsion into small plate, add some drops of hardener. The hardened emulsion should be used completely. Never add hardener to the whole emulsion. But add it only before use to make “working” solution.
On my opinion, in most cases you do not need hardener because paper is already sized with gelatin. But you need to test it with different papers. Because some people like cotton paper while the other cellulose papers. I prefer the last one and recommend to start experiments with this papers.
Erik Mathy
Hey Sasha!
I know this is an older post but I was wondering about the Fomaspeed emulsion. I’m going to start experimenting with making my own paper negatives using a liquid emulsion on paper. AG Plus used to be the emulsion of choice since it was formulated for dry plates. Rockland is sadly no longer making it.
The Fomaspeed product is very affordable but… would it make for a good quasi-dry plate emulsion? Paper plate emulsion, rather? Hah! Anyways, if you have any opinions I would love to hear them.
Thank you!!
Sasha Krasnov
Hello Erik!
Thank you for reading the article and for the question. The quality of prints seriously depends on the paper. Cellulose papers are far better than fiber-based ones. But it also may depend on the liquid emulsion type. I use Fomaspeed emulsion. Thus, my comment is according to it. Also, not all cellulose papers give great results. I recommend starting experiments with Hahnemuhle cellulose papers, they give stable results. I think Fomaspeed may give even better results with glass because it does not absorb the emulsion. So, why not try Fomaspeed emulsion with glass? Foma recommends precoating the surface with 2% gelatin. And, I think you will strictly have to use hardener included in the Fomaspeed package. Personally, I do not use hardener when coating paper, but for other surfaces, it may be required. You will need to make a series of experiments to find out the process suitable for you.
Have good dry plates!
Ella
Hi,
Thank you for the instructions. I’m trying to print images on glass using liquid light. It worked the first few times I tried, but recently the liquid light keeps shrinking/crinkling up on top of the glass. I didn’t change anything about my procedure (still washing the glass, subbing with gelatin, coating evenly with multiple coats). I’ve added black magic hardener to the developer and fixer to try and remedy the problem but it continues to crinkle. Please let me know what I am doing wrong.
Thank you!
Sasha Krasnov
Hi,
The hardener should be added to the emulsion, not to the developer/fixer. How much time passed between good and bad results? Probably better to preheat the glass before coating it.
Nora Sourouzian
Hello Sasha,
First I want to say that I really like your work and devotion for this art form. Since few months, I am starting to take analogue pictures and went right into building a darkroom to start printing my own pictures. It gives such a satisfaction!
Since few weeks I started to enjoy it more since I discovered the Foma emulsion. I am printing on water-color paper and on sketch paper as well. I am quite happy with the results the whites and black are true to themselves! But since I did read that you use sandarac varnish, I am curious to learn how exactly you do your recipe of sandarac varnish ethanol and lavender oil. I did read somewhere that you have to heat it at 300 degrees! Is that true??
Also, wondering have you tried on tissue? If yes I would like to know your experience with this.
Again Brava and thank you very much for sharing your knowledge!
I wish you all the best
Sasha Krasnov
Hello Nora,
Thank you very much for the message. Congrats on your success!
I don’t cover all prints with sandarac varnish. It depends on the print density. This kind of varnish is more suitable for prints having lots of dark areas. Anyway, I, of course, preheat the varnish not higher than 40-50°C. So, it’s just 20°C above room temperature. As for now I also use “Renaissance Wax” polish as well to cover liquid emulsion prints and classic gelatin silver prints.
Considering printing on tissue or canvas… I tried to make some prints on canvas but without acceptable results. I think the quality of the liquid emulsion prints strongly depends on the impurities in the base (paper, tissue, canvas). And probably, the canvas (and tissue) should be presoaked in distilled water for some time, and then covered with the liquid emulsion. It doesn’t mean that you should stop your experiments with it.
Have a lot of great works!
Beatrice Hamblett
Dear Sasha, First of all, thank you so much for all the information on your blog about working with liquid emulsion. I’ve read through all the entries and it has been very helpful.
My question:
I have done darkroom work for a long time making gelatin silver prints but recently I started experimenting with liquid emulsion. I really liked the results from the first bottle of Liquid Light I used. Once I started making prints using the 2nd bottle, I got some bad prints. By the time my images are in the hardening fixer, the emulsion starts peeling up and breaking down. My process was the same as the first batch. Here is what I use:
-Liquid Light
-Dektol 2:1
-Rapid Fix solution for 2 seconds maximum. This replaces a stop bath.
-Kodak Fix with Hardener for 10-15 minutes
-Wash for 15 minutes minimum
– Paper: Hahnemuhle Torchon
Can you think of any reason why the emulsion is breaking down so badly? I can send samples if you want.
Thank you so much for any information.
Best wishes,
Beatrice
Sasha Krasnov
Hello, Beatrice
Thank you for reaching my website! I’m sorry for the late reply. Did you solve the problem? It seems it’s like poor adhesion between paper and emulsion. Hahnemuhle Torchon is a great paper for liquid emulsion and gives very stable results. Did you try precoating with gelatin 2% with alumn? Most cellulose papers are already sized, Hahnemuhle is not an exception but maybe try additional paper sizing? Probably, it’s a bad gelatin solution in the second bottle. Could you drop me a message using the contact form on the “about” page? I’ll reply to you as soon as possible. It’s quite interesting to see your images!
Julio Martínez Amoros
Hello, I have been seeing the photos of Venice and Florence, I found them very interesting.
I wanted to ask you, if after emulsifying and drying the paper, can it be saved and used in later days?
Thank you very much for your contributions.
a greeting
Sasha Krasnov
Hi, Julio.
Thank you for the feedback! Yes, sure! It can be stored for some time. But, I recommend storing it no more than 3 months. This period depends more on paper rather than emulsion. Anyway, keep the ready-made paper in the fridge.
Julio Martínez Amoros
Muchas gracias por sus aportaciones y ánimo con su interesante trabajo.
Don Mullins
Sasha, I stumbled across your review of Fomaspeed Liquid Emulsion in B&H from 2016. It was very helpful, especially since it was the only one. 🙂 Thanks for the info. Then I took a look at your work at skrasnov.com and was really impressed by the prints. You are obviously a very talented craftsman and artist. Thanks for sharing your gift.
Sasha Krasnov
Thank you Don so much, for this feedback! It’s really important to me!
Lillian
Hi Sasha,
Thank you so much for sharing this information, it is really inspiring. I really want to try one my own, but I am not sure which products would work since there are so many. May I know what kind of liquid light you are using? I am thinking about the Rockland colloid liquid light, do you think that would work? Also, I am considering using rice paper, but I am not sure if it too thin to have the result. Thank you so much for sharing your gift!
Sasha Krasnov
Hi Lillian,
Thank you so much for this message! I use Fomaspeed liquid emulsion. I heard much positive feedback about Rockland emulsion but I have never tested it. Fomaspeed was much easier to get in the local store in my region when I started these experiments. The contrast of the image seriously depends on the paper. So, you will be required to conduct some tests with this emulsion. With Fomaspeed I get from bad to excellent prints. For better contrast control I use Kodak D-9 developer. Personally, I would recommend starting with cellulose watercolor paper. It makes the results more stable. Using cotton paper is a bit tricky and requires more practice.
Stef
Hi Sasha, thanks for your informative blog on liquid emulsion printing.
Much has been said by previous guests and yourself about paper types. Hahnemühle cellulose papers, I believe, are developed for watercolour painting and inkjet printing. I’m curious to know if you’ve used Hahnemühle Platinum Rag for your liquid tests, which is recommended for alternative processes like platinum printing, etc.
Sasha Krasnov
Hi, Stef
I made some tests with cotton papers and found them to be not completely successful. Thus, I decided the cotton paper is not suitable for liquid emulsion printing. So, I do not use them for serious work but only for testing purposes. Considering your question – No, I did not use Hahnemühle Platinum Rag, but not because of the described reason only. I get paper in the local art shops. Unfortunately, they sell materials intended for artists only but not for photographers. Also, unsatisfied results also prevented me from buying this paper online. I read about Hahnemühle Platinum Rag for Cyanotype printing and it was only positive feedback. I guess I would try it later. This paper is too expensive to make lots of tests.
Stef
Thanks for the info, Sasha. I plan to test the Platinum Rag, along with other Hahnemühle sample matte papers. I’ll update you with my results. Also, what type of brush do you generally use to apply the emulsion, and in what coating method yields the best results? I have experimented with a Japanese-style hake brush in the past.
Sasha Krasnov
Hi Stef,
I use the synthetic flat brush only. It is much reliable and gives stable results over a long time of usage. The width of the brush depends on the print size. In a nutshell, it is about 1/8 — 1/10 of the print width or height. The brush should also hold the necessary amount of emulsion for a single stroke from one side to the opposite side. So, I coat the paper twice: the first time — vertically, and the second time — horizontally after intermediate drying for 20-30 min (also depends on the weight of a paper). To make emulsion easier to coat I dilute it with distilled water — max. 15-20% of the weight. But it also depends on the density of the emulsion. You should feel this process. I recommend starting with undiluted emulsion. Dilute it only if the emulsion is too heavy (or viscous?) to make a single stroke from side to side but with a small amount of distilled water until it became “soft” enough to coat from side to side easily.
Katerina Gosparovich
Sasha, good day!
I just wanted to let you know that I love your photography! So much!!
I was wondering where do you live these days and would you be interested in having an assistant or protege. I’d love to learn your techniques. I’m into vintage cameras and alternative processes, no wonder your work touched me. I’d be happy to have a mentor as yourself.
Thank you so much for all the knowledge you’ve shared! Your website is priceless!
Best regards,
Katya
Sasha Krasnov
Hello Katya! I am so sorry for the late answer. Thank you so much for your message and for supporting me! If you would talking about printing techniques do not hesitate to ask me right there in the commentary section. The answers might be helpful to other people in their printing experiments.
As for personal matters I would be glad to talk about them and answer your questions confidentially. So, just let me know in the comment a nd I will drop you a message directly to your e-mail box.
Jacob
Hi Sasha!
Hope you’re well?
Just a quick question – I’ve done liquid emulsion printing before but was wondering the best fixer to use? I remember someone saying hard fixers aren’t the best for it was just wondering what you suggested?! Thanks in advance !
Sasha Krasnov
Hi Jacob,
Probably I’m too late, and sorry about that but I use Agfa Agefix which is actually Compard Fix Ag. From time to time I use Fomafix which is also a quite good rapid fixer but has a bit less fixing capacity.
Karyn Priestley
Hi there! Your article has been very helpful. I have been using fixed grade liquid emulsion to print onto egg shells. I have tried different application techniques, however, I continue to get a yellow stain in the centre of the egg, as if the emulsion is setting in a pool. Can you advise me at all as to why this is? Thank you! 🙂
Sasha Krasnov
Hi,
It’s quite hard to tell something about this issue with no example. Do you cover the internal or external surface of the eggshell?
Karyn
Hello! Sorry for the late reply. I believe now that it was just down to the coating technique and fixing time. I’ve had mixed results but I guess these processes take time to master. Thank you anyway! 🙂
Sasha Krasnov
You’re welcome 😉 it’ interesting to know about your future experiments!
Elyane
Bonjour,
Merci pour les détails de votre méthode.
Je suis artiste plasticienne en photographie et arts plastiques. J’ai pratiqué la photographie argentique et le labo argentique. J’ai vu que les méthodes de tirage sont identiques au labo argentique (classique)…
en ce qui concerne le contraste, je faisais des bandes de tests du noir au blanc avec la gamme de gris, pour trouver le bon contraste, en trouvant les noirs et donc le bon temps d’exposition. J’exposais avec ce temps de pose, et ensuite je corrigeais en utilisant un filtre multi grade (pour renforcer le contraste filtre 4ou5, ou pour adoucir avec filtre 0à2). J’utilisais aussi un cache pinceau par zone pour atténuer l’exposition et faire sortir des gris, ou un trou dans un carton pour réexposer une zone(l’équivalent de densité moins, densité plus dans photoshop). Mais cela implique d’utiliser une émulsion liquide à contraste variable. (ceci est une proposition aussi pour la dame qui avait des pb de contraste)
Est ce que je peux utiliser cette méthode pour le tirage avec émulsion liquide ?
Merci pour votre réponse, merci beaucoup pour tous vos conseils.
Bien cordialement Elyane
Sasha Krasnov
Hi! I’m so sorry for the late answer but considering your question — Yes, you can expose liquid emulsion in the way you described. Anyway you will need a variable constrast liquid emulsion like Rollei Black Magic for instance.
Natalie
Hi Sasha! Are there fundamental difference in liquid emulsion and the precoated silver gelatin papers like Ilford? I am trying to make lumen prints on other materials besides paper using liquid light but am finding that the liquid light isn’t turning colors like lumen prints on photo paper.